

The flow we’re building
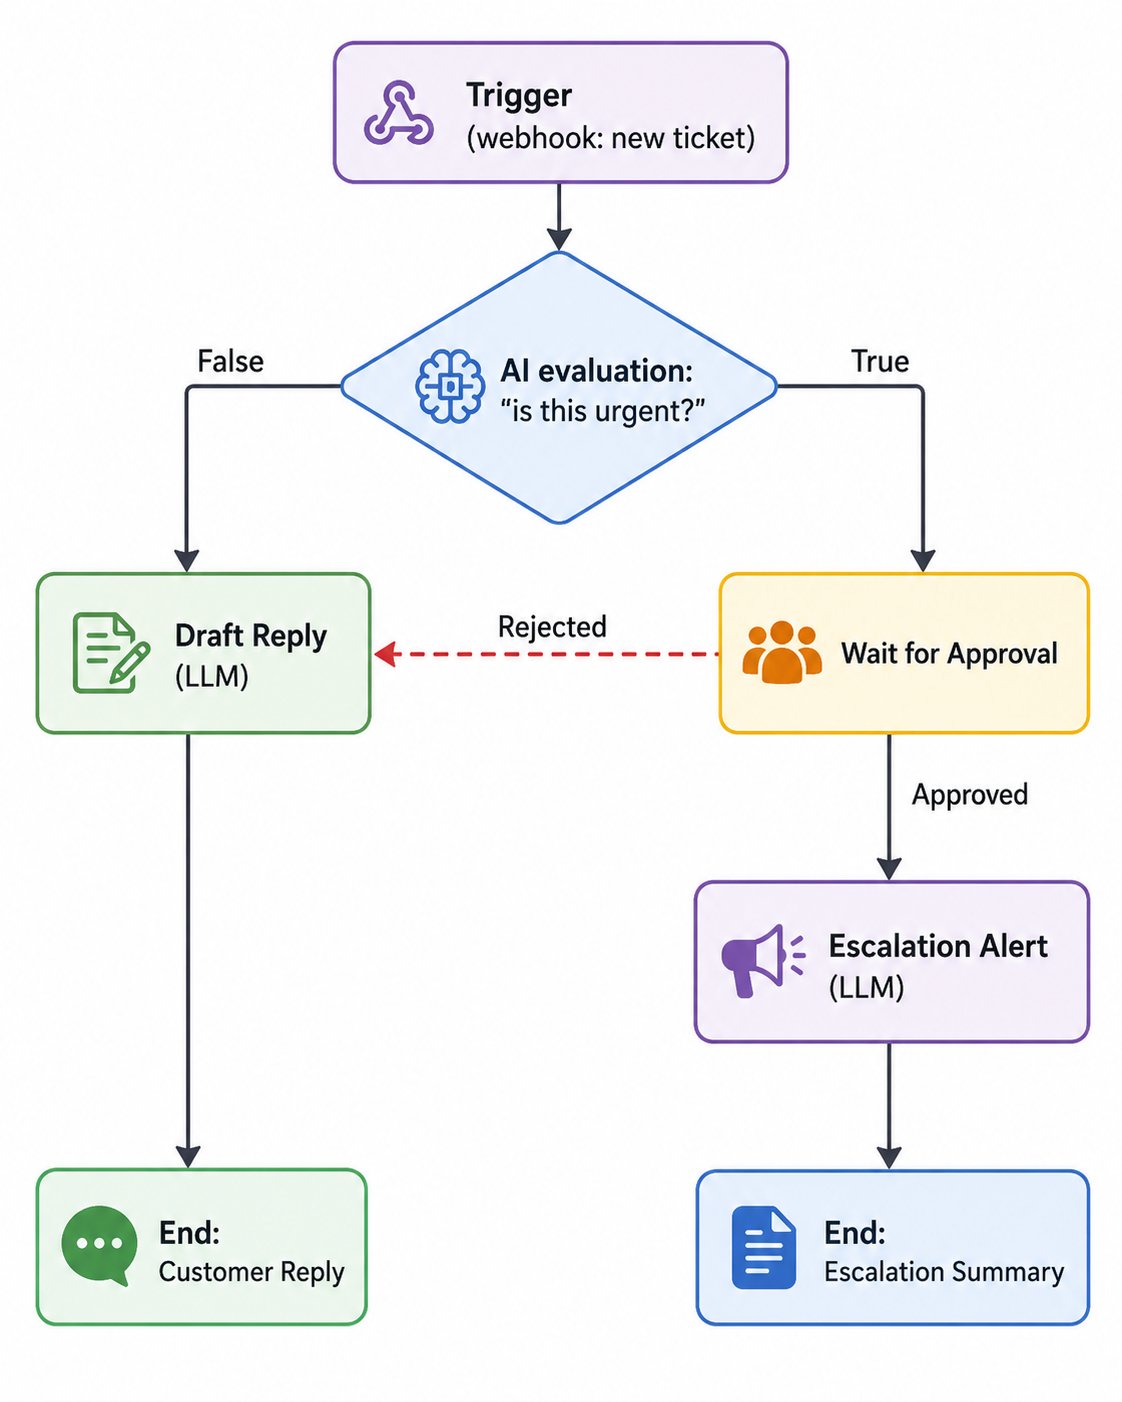
Before you start
Nothing to set up in advance — this flow only uses plain LLM nodes, so there’s no knowledge base or database to connect first. You’ll just need one real email address (yours, or a support lead’s) to receive the approval email when you test the flow later.Part 1 — Create the SuperFlow
- Sidebar → Create Agent.
- Choose SuperFlow.
- In the “New SuperFlow” panel that opens:
- Name — e.g. “Support Ticket Triage”
- Leave “Start from a template” alone — we’re building this one from scratch.
- Click Create empty.
Part 2 — Build the canvas
2a. Configure the Trigger
Every SuperFlow starts with exactly one Trigger node. If it’s not already on the canvas, drag it in from the left node palette.- Click the Trigger node.
- Under Input Schema, click + Add field three times to define what a ticket looks like:
customer_name— type String, check Reqemail— type String, check Reqmessage— type String, check Req, and also check Multi (so it renders as a multi-line box when testing)
- Under Trigger sources, stay on the Webhook tab and toggle Enable webhook trigger on.
- (The actual Webhook URL and a Copy button appear here once you’ve saved the flow at least once — we’ll come back to this in Part 4.)
2b. Add the If node
- From the left node palette, drag (or click) If onto the canvas and connect the Trigger’s output into it.
- Click the If node and toggle on AI evaluation.
- In the Condition box, describe the check in plain English: “Is this customer message urgent, angry, or a serious complaint that needs a human to check before anything is sent?”
- Pick a Provider and Model below it (any chat model works fine here).
2c. Add “Draft Reply” (handles the routine case)
- Drag an LLM node onto the canvas.
- Connect the If node’s False output into it.
- Click it and rename it (via the node’s title field) to “Draft Reply”.
- Fill in:
- System Prompt — e.g. “You are a helpful, polite customer support agent. Write a short, warm reply to the customer’s message.”
- Query — reference the ticket’s message field from the Trigger (use the field-reference picker next to the box to insert it) so the LLM actually sees what the customer wrote.
- Provider / Model — pick your preferred model.
2d. Add the Wait for Approval node (handles the serious case)
- Drag a Wait for Approval node onto the canvas.
- Connect the If node’s True output into it.
- Click it and fill in:
- Approval Message — e.g. “A customer sent an urgent/angry message — please confirm this needs escalating.” (reference the ticket’s message field so the reviewer can actually read it)
- Notify Emails — add your own email address here for testing (this is who gets the approval email)
- Email Subject (optional) — e.g. “Approval needed: Support Ticket Triage”
2e. Add “Escalation Alert” (only fires when a human confirms)
- Drag another LLM node onto the canvas.
- Connect Wait for Approval’s Approved output into it.
- Rename it “Escalation Alert”.
- Fill in:
- System Prompt — e.g. “Summarize this customer complaint into a short, urgent internal alert for the support team lead.”
- Query — reference the ticket’s message field again.
2f. Reconnect the “false alarm” path
- Connect Wait for Approval’s Rejected output into the same “Draft Reply” node from step 2c (a node can have more than one incoming connection — this means “reviewed and it wasn’t actually urgent, so just send the normal reply”).
2g. Add the two end points
- Drag a No-Op node, connect it after Draft Reply, and set its Output field to the field holding the drafted reply — this makes the reply show up as the flow’s visible result when testing.
- Drag a second No-Op node, connect it after Escalation Alert, and set its Output field the same way, pointing at the escalation summary.
2h. Save
Click Save SuperFlow (top of the canvas).Part 3 — Test it
- Click Run (top of the canvas) to open the run panel.
- Fill in the trigger fields you defined in 2a:
customer_name— e.g. “Jordan Lee”email— e.g. “jordan@example.com”message— try a routine one first, e.g. “Hey, what are your business hours?”
- Click Run. Watch it flow through If → False → Draft Reply → End, and check the drafted reply makes sense.
- Run it again with an urgent-sounding message instead, e.g. “This is the third time your app has charged me twice and nobody has replied to my emails, I’m furious.”
- This time it should take the True path into Wait for Approval — the flow pauses here. Check the inbox for the email address you put in Notify Emails; you’ll get a message with a direct link to the approval screen.
- Open that link and click Approve — the flow resumes into Escalation Alert, and you’ll see the internal alert as the result. Try running it again and clicking Reject instead, to confirm it correctly falls back into Draft Reply.
Part 4 — Connect it to a real support form (optional)
- Back on the Trigger node, with Enable webhook trigger already on, copy the Webhook URL shown there (click Copy).
- Point your actual support form, helpdesk tool, or ticketing system’s outgoing webhook at that URL, sending
customer_name,email, andmessagein the request — matching the schema from 2a. - Every real ticket submitted now runs through this exact flow automatically.
Quick checklist
- SuperFlow created from scratch (Part 1)
- Trigger’s input schema defined:
customer_name,email,message(Part 2a) - Webhook trigger source enabled (Part 2a)
- If node set to AI evaluation with a clear plain-English condition (Part 2b)
- Draft Reply LLM node configured and connected to both the False and Rejected paths (Part 2c, 2f)
- Wait for Approval configured with a real notify email (Part 2d)
- Escalation Alert LLM node connected to the Approved path (Part 2e)
- Both paths end in a No-Op node with an output field set (Part 2g)
- Flow saved (Part 2h)
- Tested both a routine and an urgent message in the Run panel, including approving and rejecting (Part 3)
- Webhook URL wired into a real support form, if going live (Part 4)