Connecting Lyzr Agents to Microsoft Teams: A Cookbook
This guide walks you through deploying a Lyzr AI agent as a Microsoft Teams bot — from Azure setup to chatting with your agent inside Teams.How It Works
Prerequisites
- A Lyzr Studio account with at least one agent created
- A Microsoft account with access to portal.azure.com — the free tier is sufficient
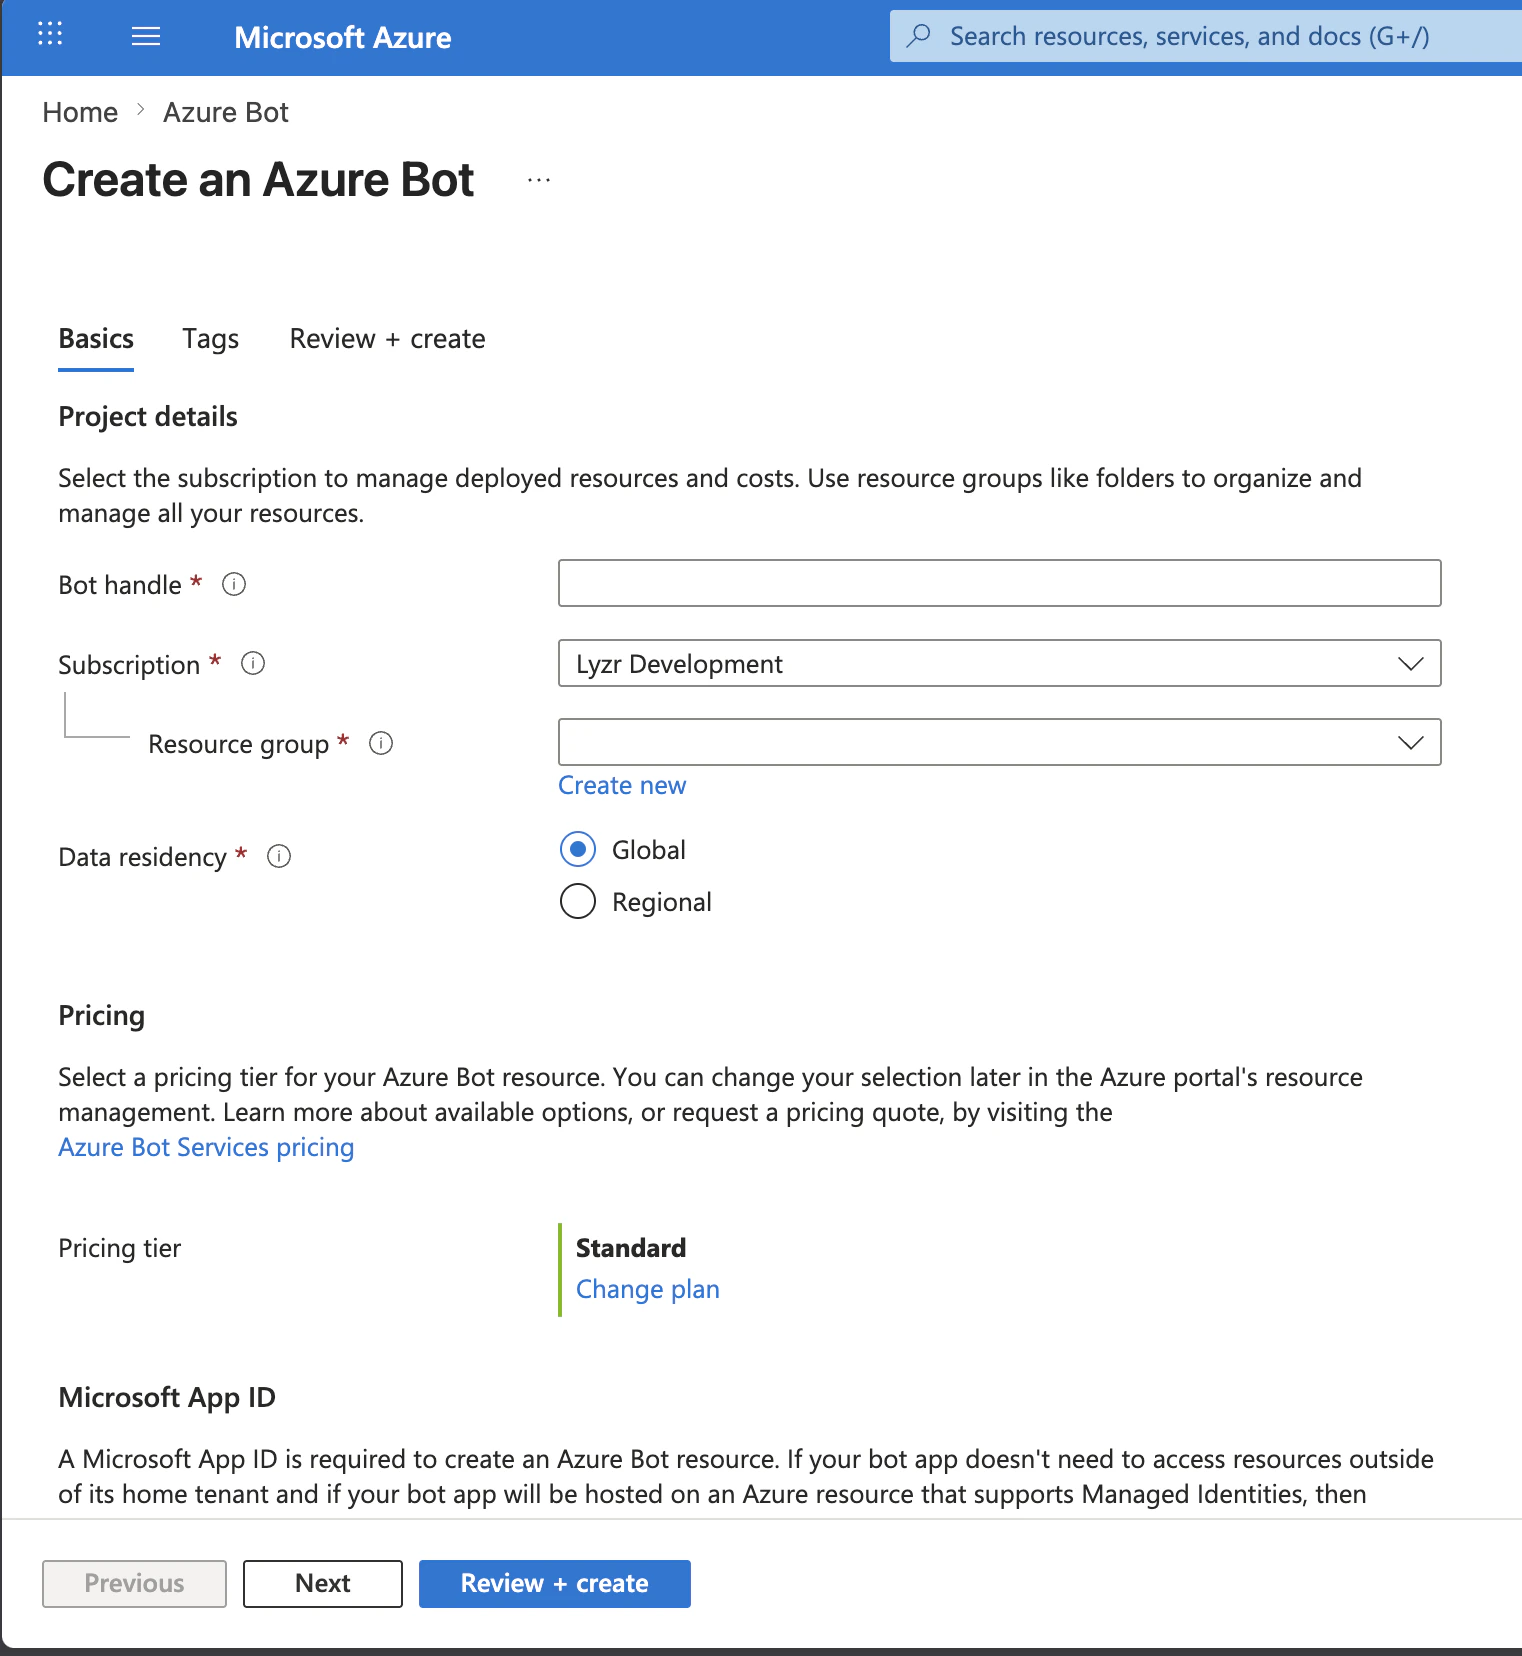
Step 1: Create an Azure Bot Resource
- Go to portal.azure.com and click “Create a resource”
- Search for “Azure Bot” and select it
-
Click Create and fill in the following:
Field Value Bot handle A unique name, e.g. my-lyzr-botSubscription Your Azure subscription Resource group Create new or use an existing one Pricing tier F0(free) is fine for testingMicrosoft App ID Select “Create new Microsoft App ID” - Click Review + Create, then Create
Step 2: Get Your Microsoft App ID
- Once deployment completes, open your Azure Bot resource
- Click Configuration in the left sidebar
- Copy the value in the Microsoft App ID field
💡 Save this as your app_id.
Step 3: Create an App Password (Client Secret)
- On the same Configuration page, click the “Manage Password” link
- This opens the app registration in Microsoft Entra ID
- Alternatively: go to Microsoft Entra ID → App registrations and find your bot by name
- Click Certificates & secrets in the left sidebar
- Under Client secrets, click “New client secret”
- Enter a description (e.g.
lyzr-bot-secret), choose an expiry, and click Add - Copy the secret Value immediately — it is not shown again
💡 Save this as your app_password. If you lose it, you must create a new secret and update Lyzr’s channel configuration.
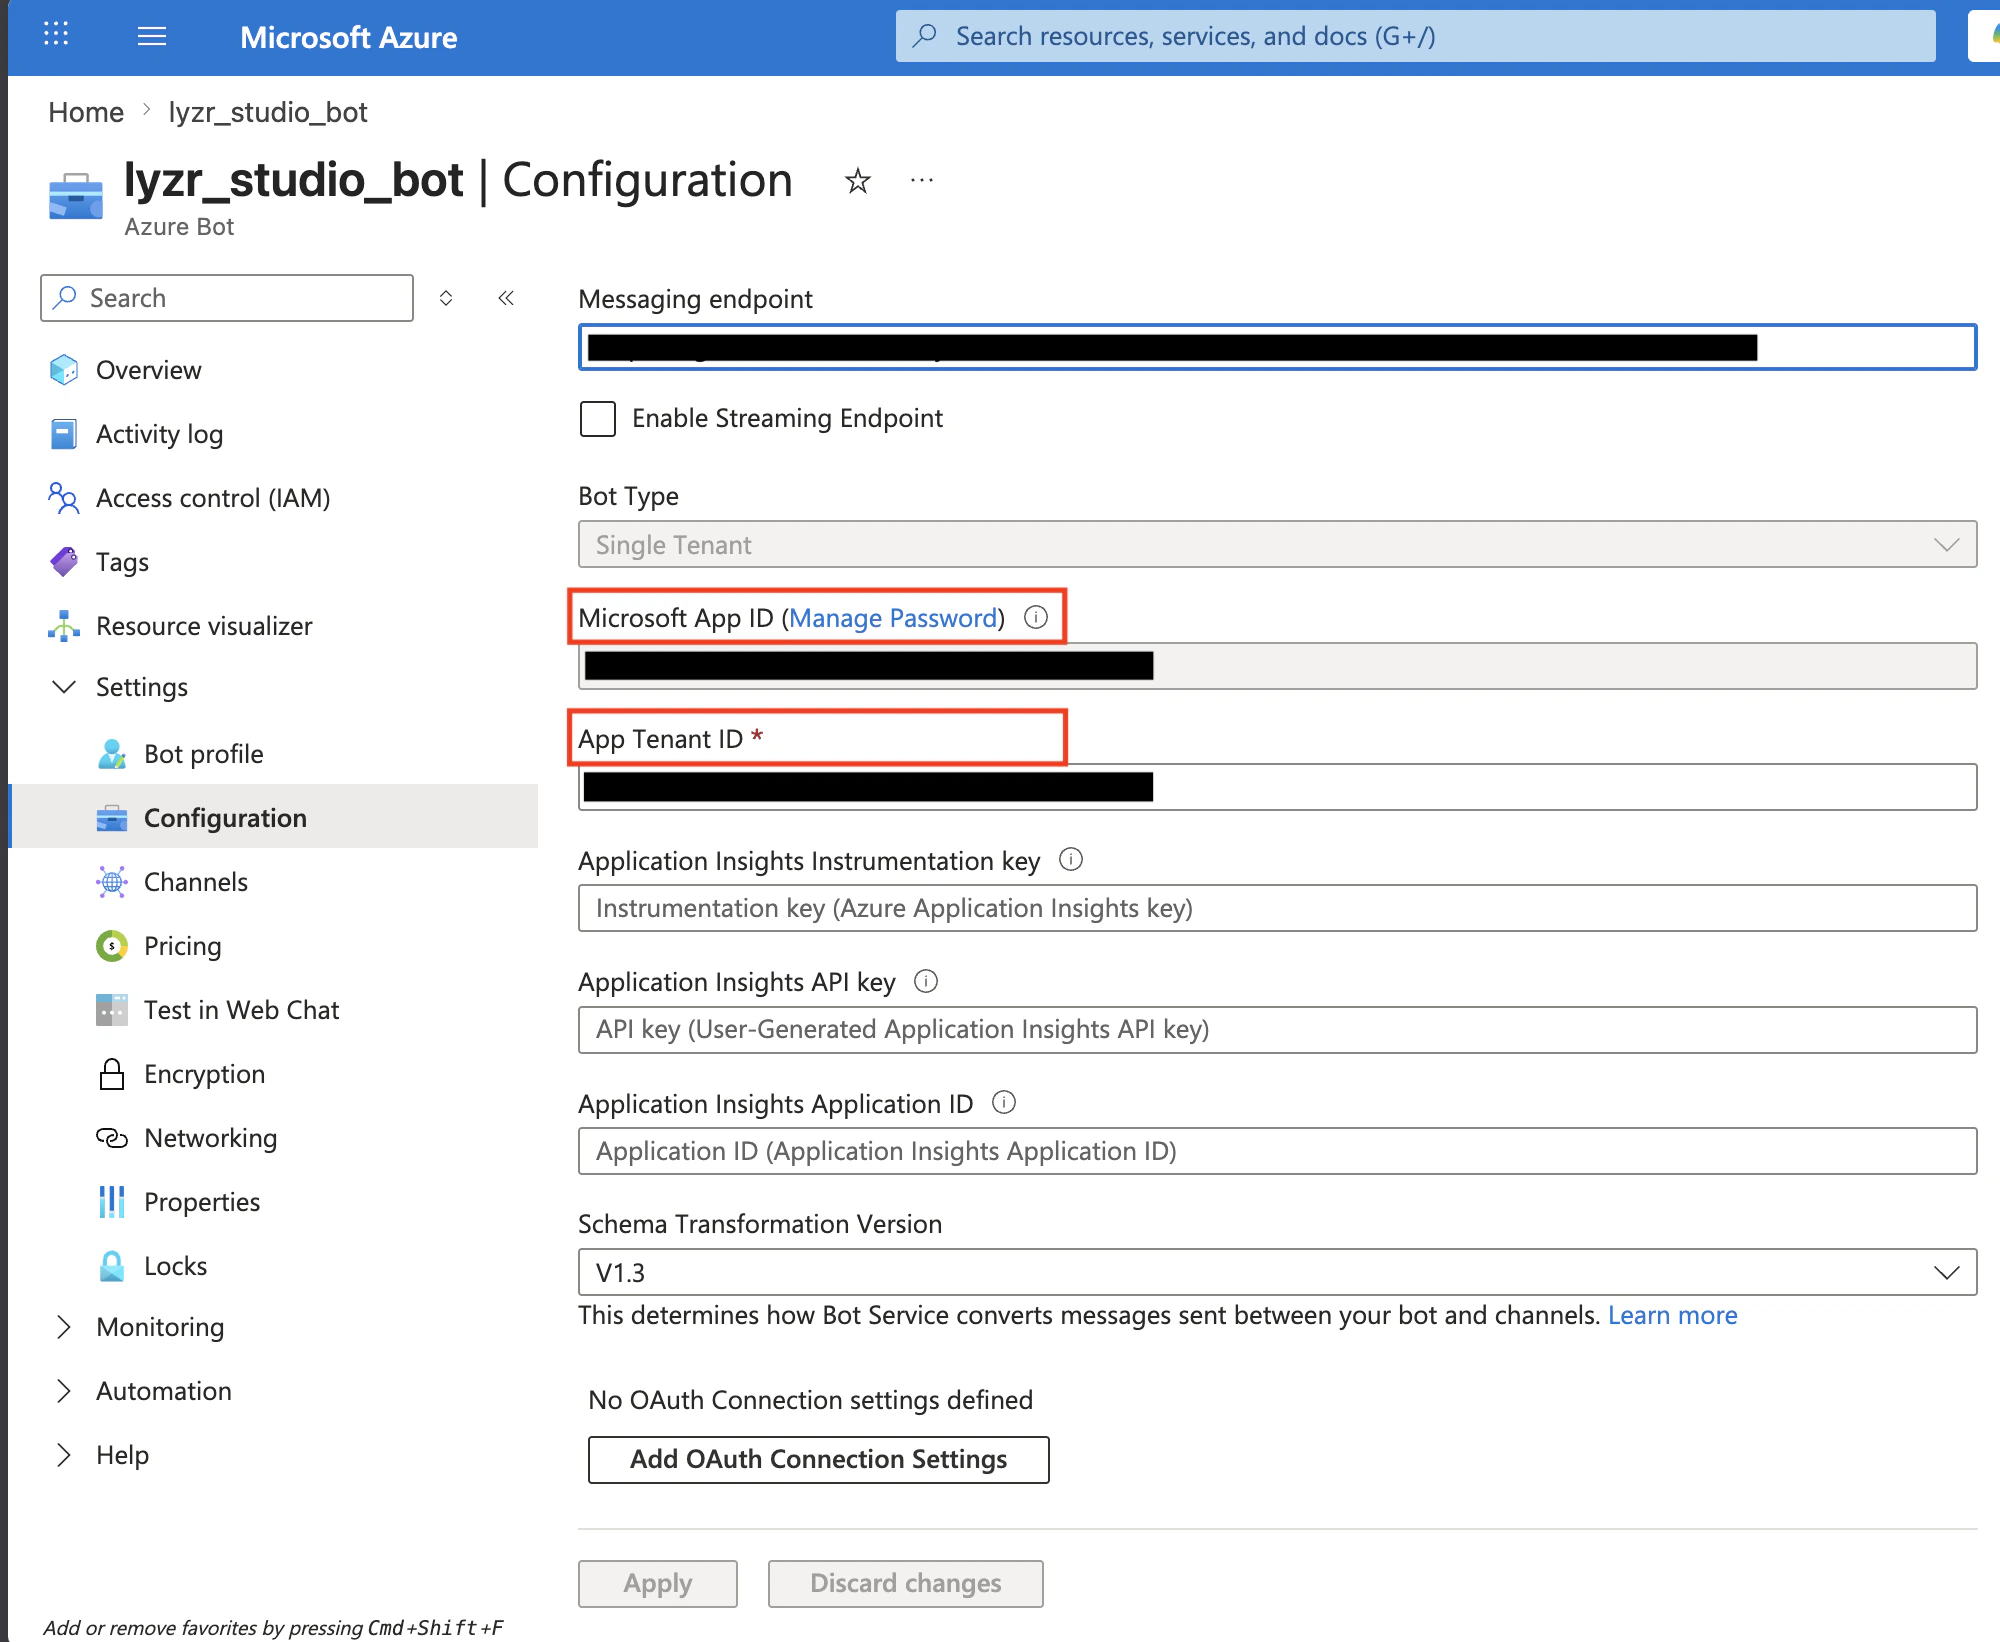
Step 4: Find Your Tenant ID
The Tenant ID identifies which Azure AD tenant your bot belongs to. This is required because Azure Bot Service now creates Single Tenant apps by default, and the token endpoint differs from older multi-tenant bots. Option A — Via Azure Bot Configuration (easiest):- Go to your Azure Bot resource → Configuration
- Copy the value in the App Tenant ID field
- In the Azure Portal, search for “Microsoft Entra ID”
- On the Overview page, copy the Tenant ID
💡 Save this as yourtenant_id. It is a UUID that looks likexxxxxxxx-xxxx-xxxx-xxxx-xxxxxxxxxxxx.
Step 5: Enable the Teams Channel
- In your Azure Bot resource, click Channels in the left sidebar
- Click Microsoft Teams
- Accept the terms and click Agree
- Click Save
Step 6: Configure the Channel in Lyzr
- Open the Agent Builder page in the Lyzr UI
- Click the Channels button (top-right toolbar, left of Executions)
- Click Configure next to Microsoft Teams
-
Fill in the form:
Field Value Microsoft App ID Your app_idfrom Step 2App Password Your app_passwordfrom Step 3Tenant ID Your tenant_idfrom Step 4Default Agent Select the agent to handle messages - Click Create Channel
-
A Webhook URL will be displayed — copy it. It looks like:
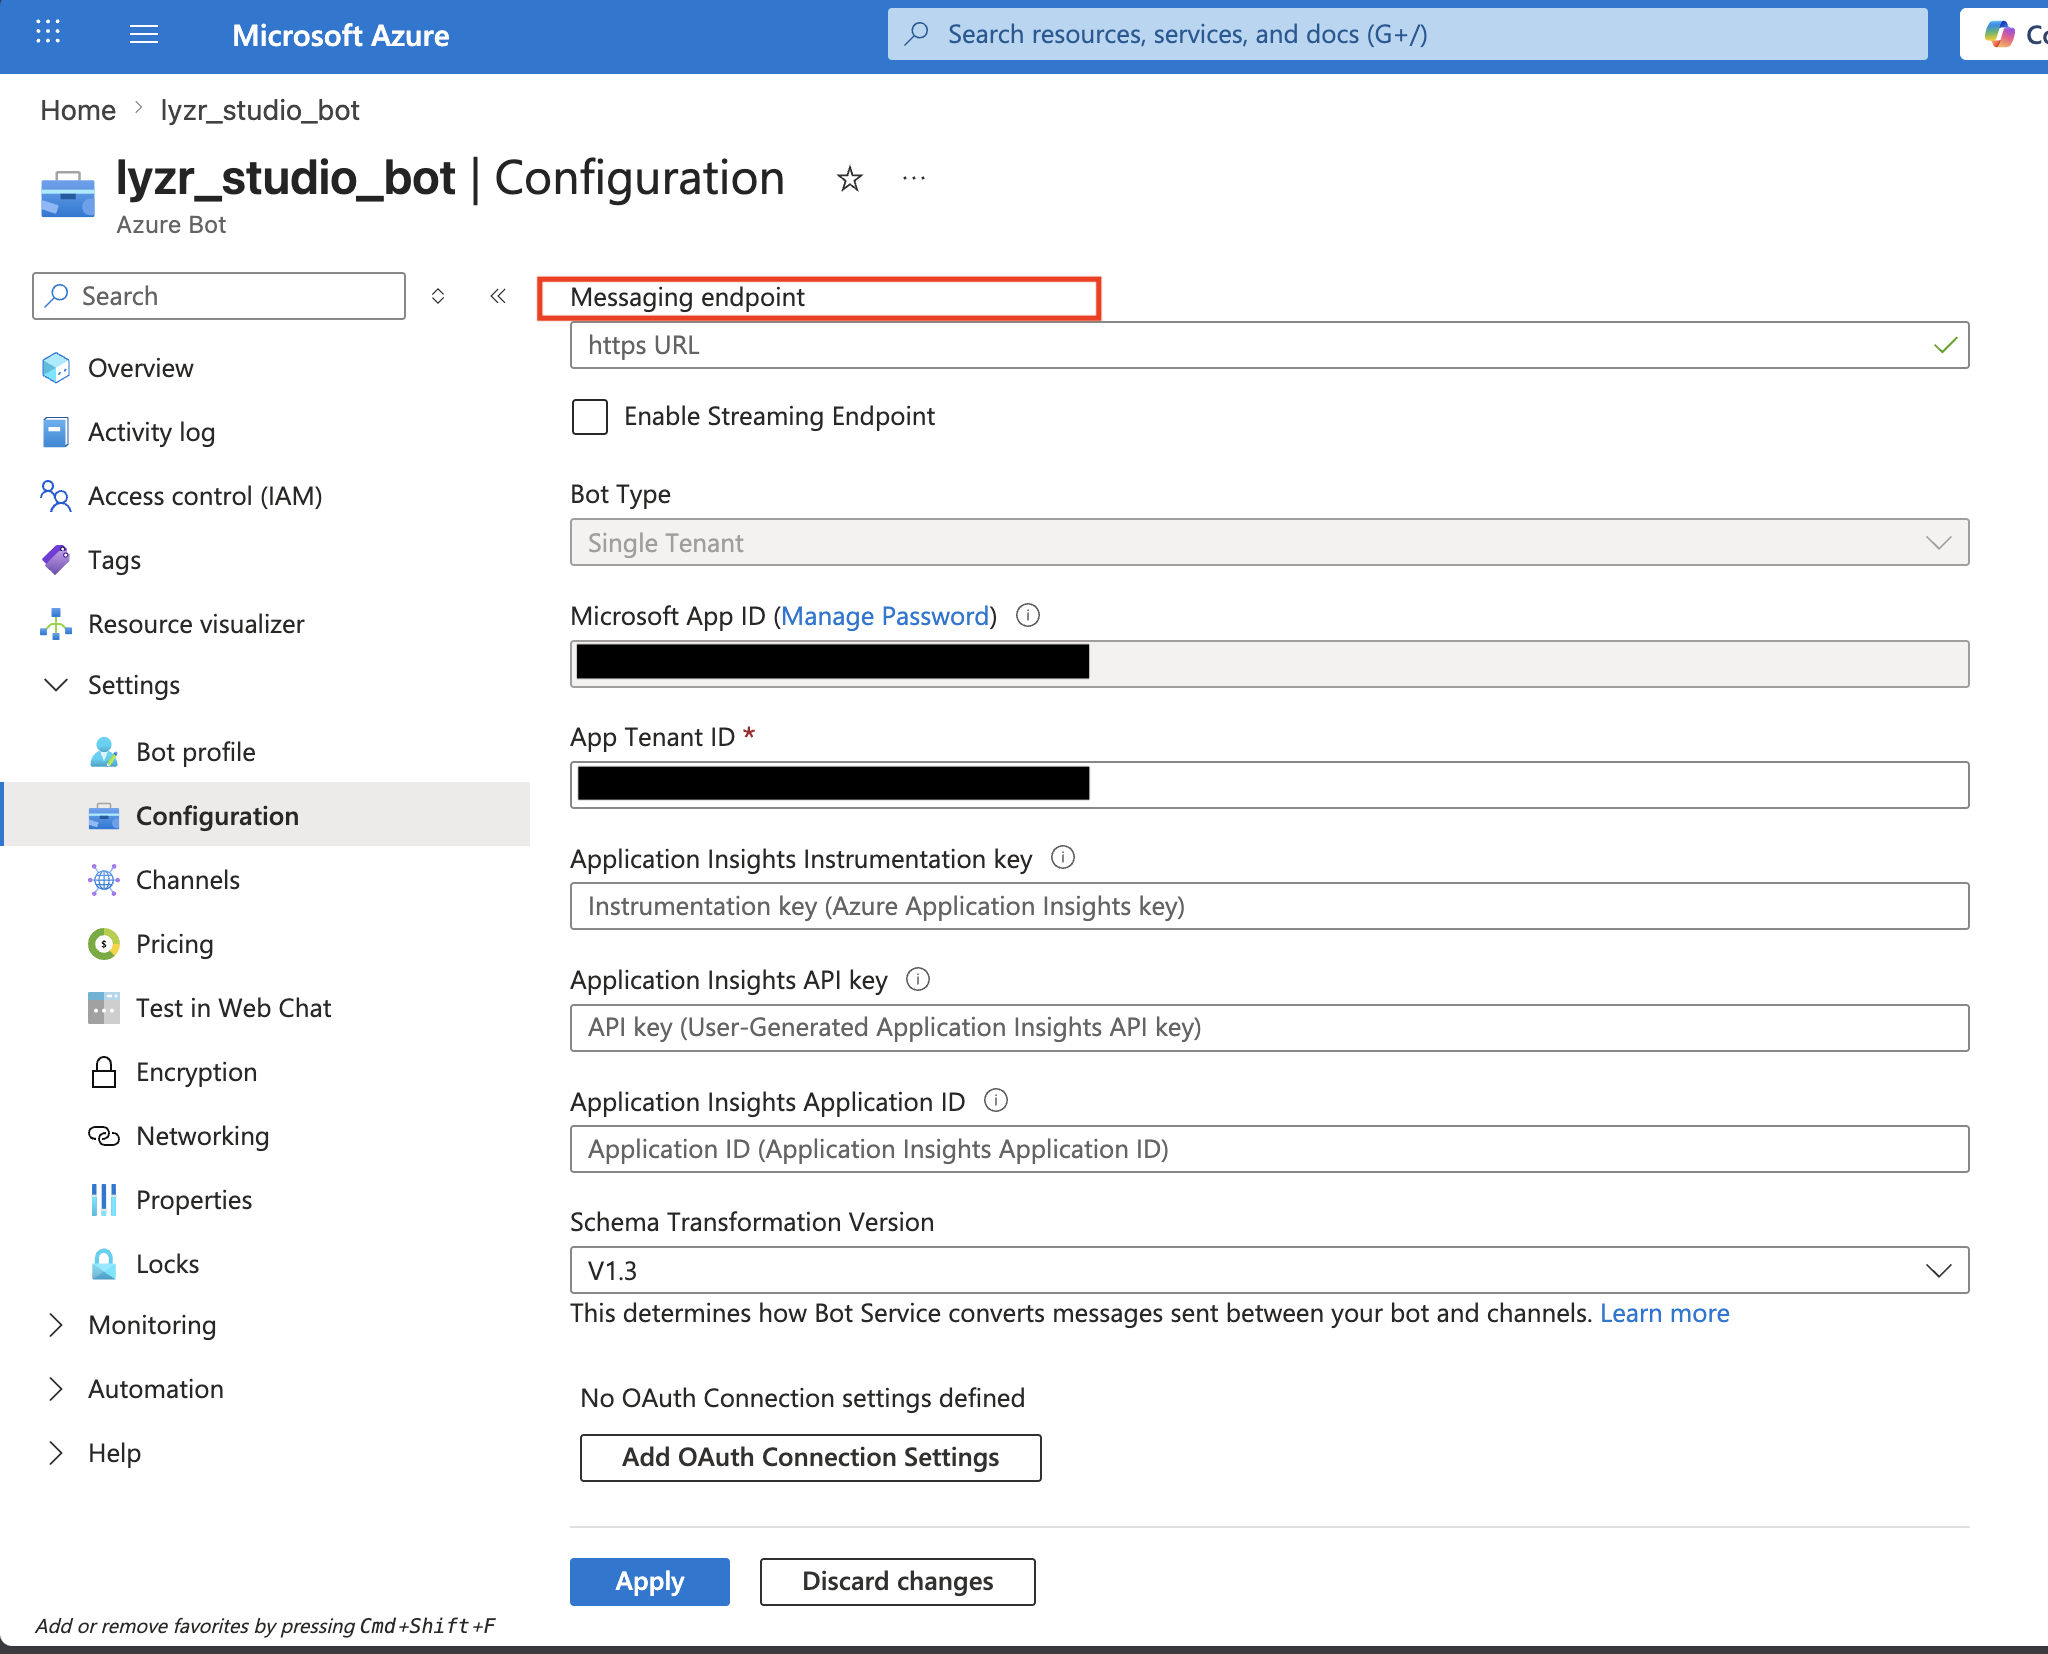
Step 7: Set the Messaging Endpoint in Azure
- Go back to your Azure Bot resource in the Azure Portal
- Click Configuration in the left sidebar
- Paste the Webhook URL from Step 6 into the Messaging Endpoint field
- Click Apply
Step 8: Add the Bot to Teams
Choose the method that fits your situation. Option A (sideloading) is the fastest for testing.Option A: Sideload via Developer Portal (Recommended for Testing)
No App Store publishing required.- Go to dev.teams.microsoft.com → Apps → New app
-
Fill in all required fields under Configure → Basic information:
Field Example Value Short name My Lyzr BotShort description AI agent botFull description An AI agent powered by LyzrDeveloper name Your name or company Website https://lyzr.aiPrivacy policy https://www.lyzr.ai/privacy-policy/Terms of use https://www.lyzr.ai/legal/Application (client) ID Your app_idfrom Step 2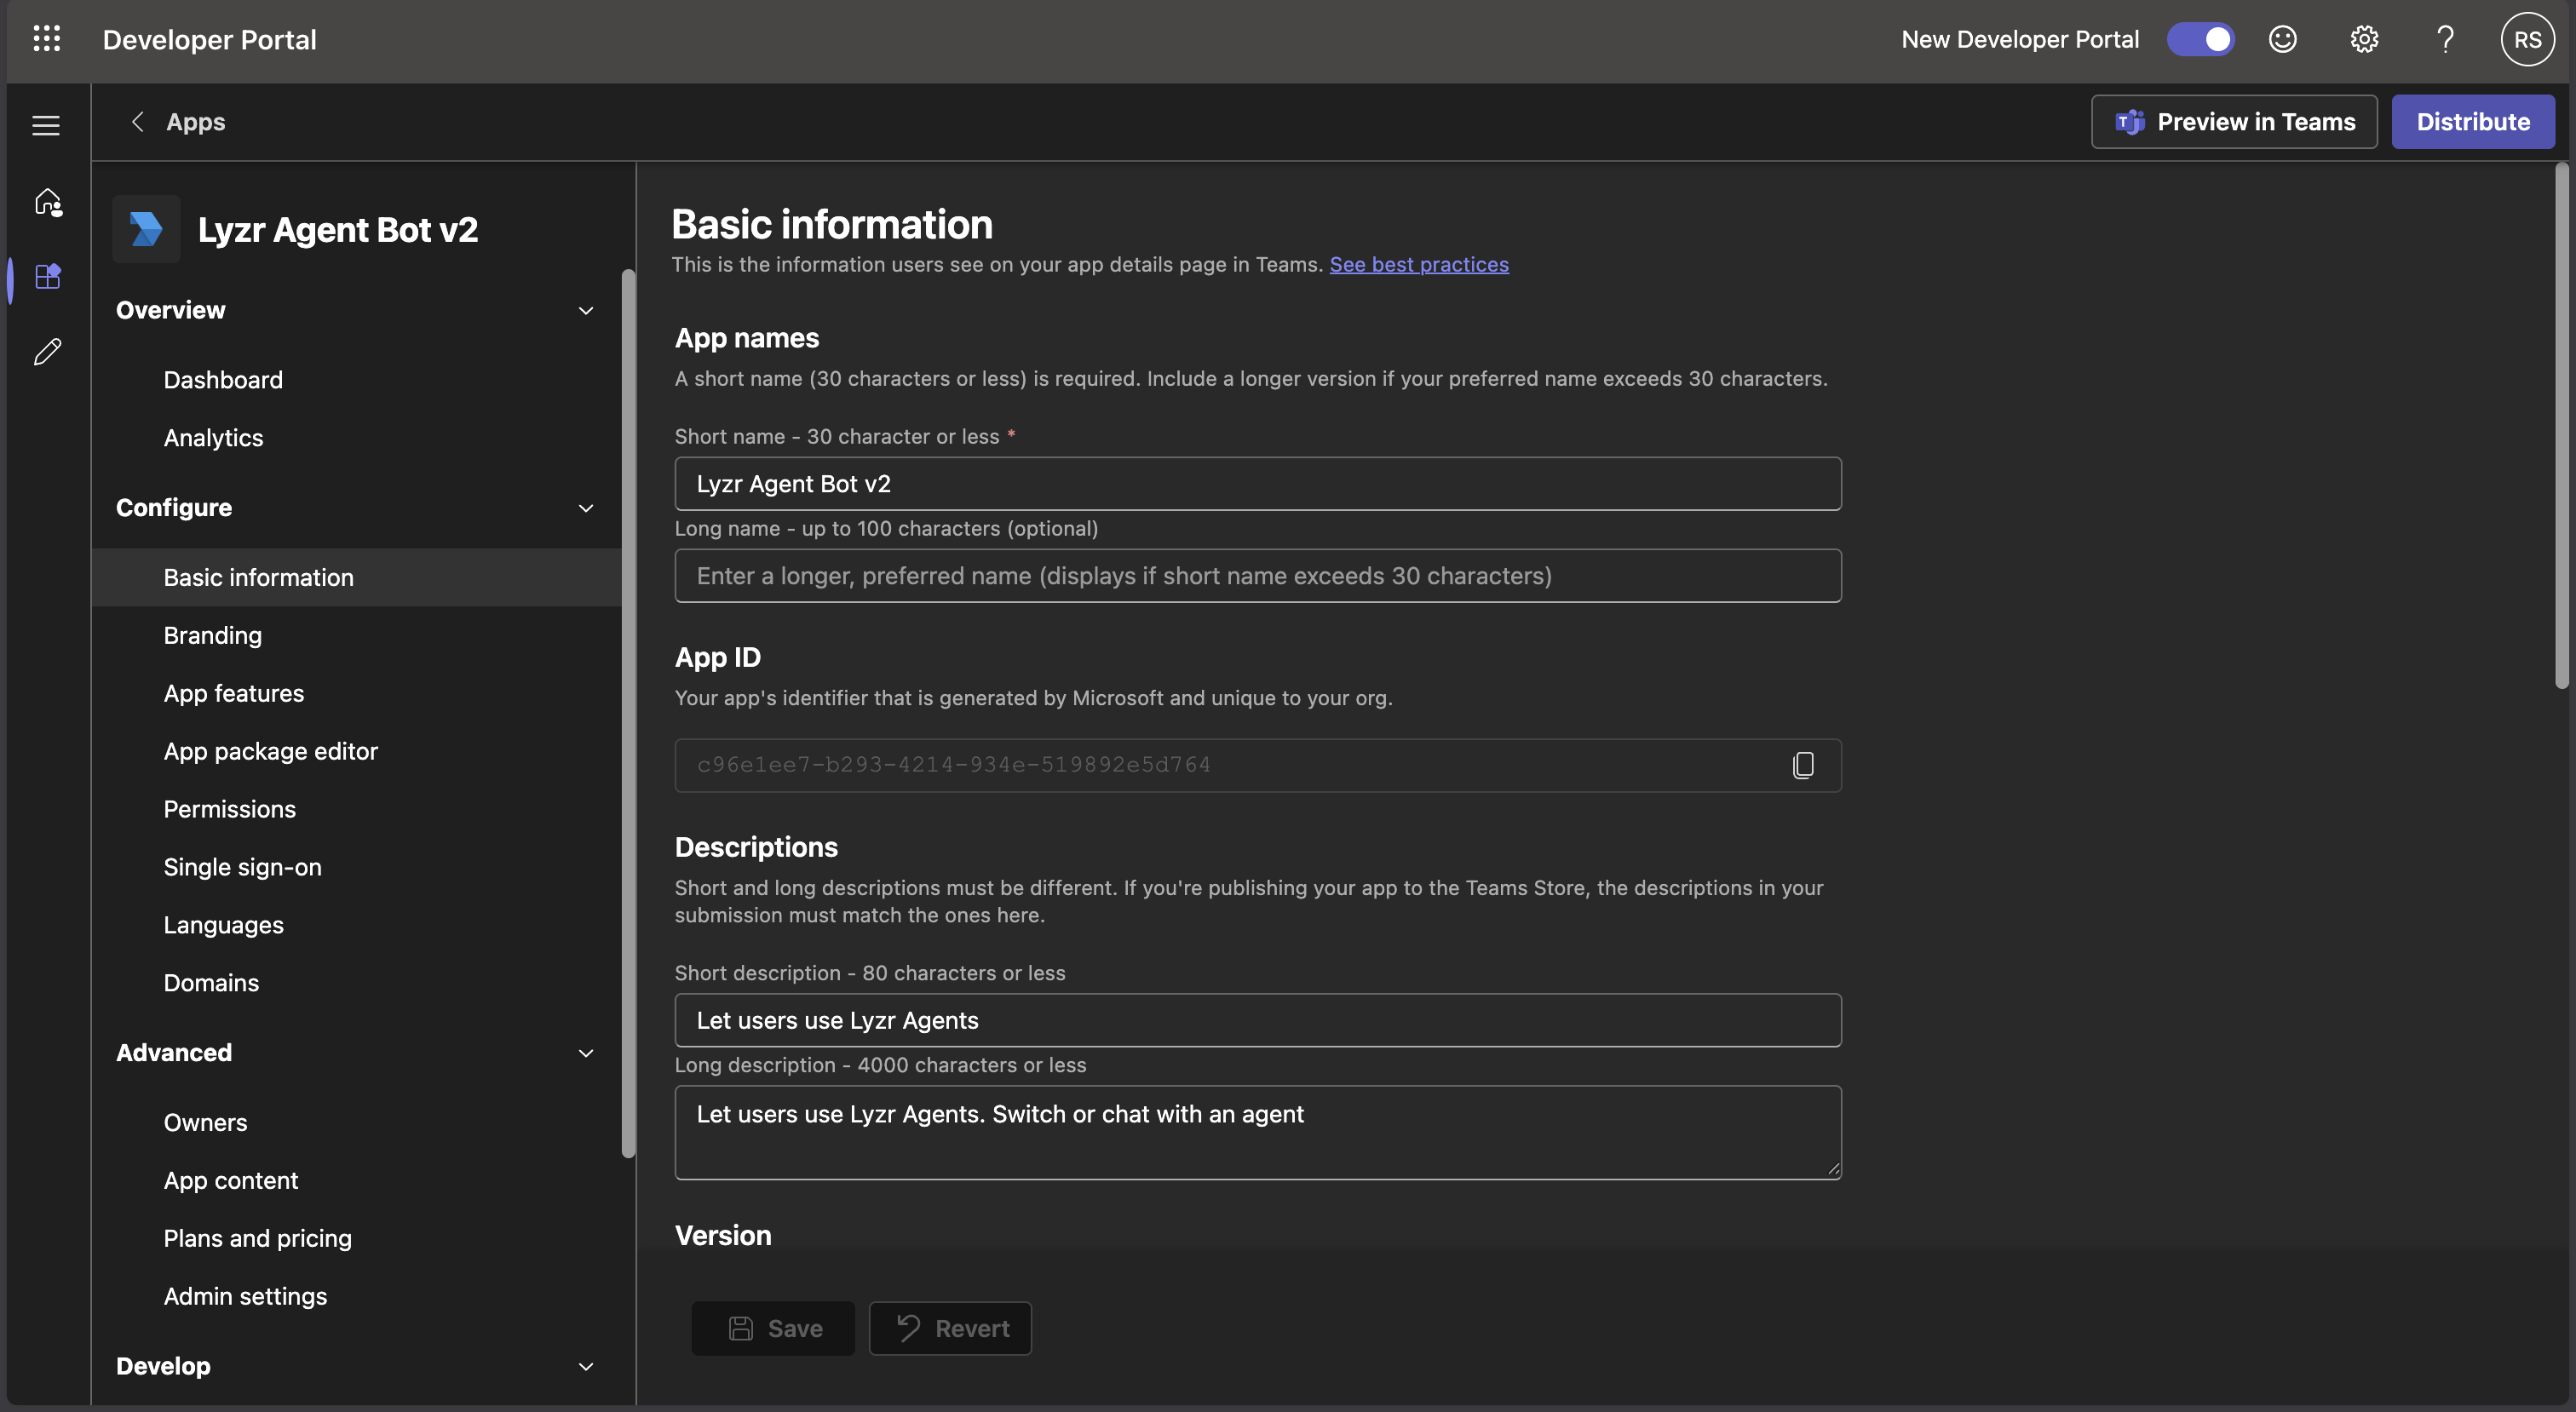
- Under Branding, upload a 192×192 px color icon and a 32×32 px outline icon (any PNG works for testing)
- Go to App features → Bot
-
Select “Enter a bot ID” and paste your
app_id - Under Scopes, check Personal (for 1:1 DM conversations)
- Click Save
- Click Publish → Preview in Teams
- When prompted in Teams, click Add
- The bot will appear in your Teams sidebar under Chat — click it and start messaging
Option B: Install from the Org App Store
If an admin has published the app to your organization:- In Teams, click Apps in the left sidebar
- Search for your bot’s name
- Click the result → Add
Option C: Direct Search in Chat
If the bot is already installed in your tenant:- In Teams, click the Chat icon in the left sidebar
- Click the pencil / compose icon (New Chat)
- In the To: field, type your bot’s name
- If it appears in suggestions, click it and start typing
Linking Multiple Agents to a Channel
After initial setup, you can link multiple agents to a single Teams bot. Users can then switch between agents using commands.Via the Lyzr UI
- Open Channels in the Agent Builder
- Click Manage agents on the configured Teams channel
- Toggle agents on/off to link or unlink them
- Each agent gets a name used with the
/switchcommand
Via the API
Add an agent:The default agent cannot be removed. To change it, delete the channel and recreate it with a different default agent.
Bot Commands
Once multiple agents are linked, users can interact using these built-in commands:| Command | Description |
|---|---|
/agents | List all agents linked to this channel |
/list | Same as /agents |
/switch <n> | Switch to a different agent by name |
Troubleshooting
Bot receives the message but doesn’t reply
Cause: The OAuth2 token request is going to the wrong tenant endpoint. Azure now creates Single Tenant apps by default, which requires your actual Tenant ID — not the genericbotframework.com endpoint used by older multi-tenant bots.
Fix: Make sure the Tenant ID field in Lyzr’s Teams channel configuration is set to your Azure AD Tenant ID (the UUID from Step 4), not left blank.
”Upload failed due to an invalid BotId in your manifest”
Symptom: When clicking Add in Teams after sideloading, you see this error. Cause: The Bot ID in the Teams Developer Portal does not match the Microsoft App ID registered in Azure Bot Service. Fix:- Go to dev.teams.microsoft.com → your app → App features → Bot
- Verify the Bot ID matches your
app_idfrom Azure Bot → Configuration exactly - Re-save and click Preview in Teams again
Validation error when clicking “Preview in Teams”
Symptom:Schema validation failed... Required properties are missing
Cause: Required fields in the app manifest are empty.
Fix: Go to Developer Portal → your app → Configure → Basic information and fill in all fields — especially short name, full description, developer name, website URL, privacy policy URL, and terms of use URL. Placeholder URLs like https://example.com are acceptable for testing.
Bot is installed but shows no reply
- Confirm the Messaging Endpoint in Azure Bot → Configuration points to your Lyzr Webhook URL and is publicly reachable
- For local development, use ngrok: start the tunnel first, then update both Lyzr (channel config) and Azure (Messaging Endpoint) with the ngrok URL
- Verify the Microsoft Teams channel is enabled in Azure Bot → Channels
- Check your server logs for error details
Client secret has expired
Client secrets have an expiry date set at creation. If your bot suddenly stops replying:- Go to Microsoft Entra ID → App registrations → your bot app → Certificates & secrets
- Create a new client secret and copy the Value immediately
- Delete the Teams channel in Lyzr and recreate it with the new
app_password
Teams messages not reaching Azure Bot (Web Chat works but Teams doesn’t)
Cause: A mismatch between the App ID in the Teams app manifest, the Azure Bot resource, and the Entra app registration. Fix:- In Azure Bot → Channels → Microsoft Teams — remove the Teams channel, save, then re-add and save
- Confirm all three places show the same
app_id:- Azure Bot → Configuration → Microsoft App ID
- Entra App Registration → Overview → Application (client) ID
- Teams Developer Portal → App features → Bot ID
Credentials Reference
| Credential | Where to Find It | Notes |
|---|---|---|
app_id | Azure Bot → Configuration → Microsoft App ID | Also called Application (client) ID |
app_password | Entra App Registration → Certificates & secrets | Copy immediately — not shown again |
tenant_id | Azure Bot → Configuration → App Tenant ID, or Entra ID → Overview | Required for Single Tenant bots (Azure default) |
| Webhook URL | Lyzr Channels UI after creating the Teams channel | Paste into Azure Bot → Configuration → Messaging Endpoint |