> ## Documentation Index
> Fetch the complete documentation index at: https://docs.lyzr.ai/llms.txt
> Use this file to discover all available pages before exploring further.
# Agents
> Introduction and overview of agents
## Introduction
Agents are the core building blocks within the Lyzr ecosystem, designed to automate tasks, provide intelligent responses, and integrate seamlessly with your data and workflows. Each agent is powered by advanced Large Language Models (LLMs) and enriched with customizable roles, instructions, and tools to perform specific functions.
Learn to build custom Lyzr agents to automate workflows.
## Overview
In the Agent Lab, you can create, configure, test, and deploy AI agents tailored to a variety of use cases — from customer support chatbots and knowledge assistants to data fetchers and workflow orchestrators. Agents operate autonomously yet remain highly configurable, allowing you to fine-tune their behavior to match your business needs.
Key features of Lyzr agents include:
* **Role-based customization:** Define the agent’s persona and task focus to generate contextually relevant responses.
* **Multi-tool integration:** Extend agent capabilities with custom tools like email sending, database querying, and more.
* **Knowledge base connectivity:** Equip agents with domain-specific knowledge for accurate and informed interactions.
* **Safe and responsible AI:** Built-in safety layers ensure ethical, secure, and reliable AI behavior.
* **Testing & deployment:** Easily test agents in real time before deploying them to production or the Agent Marketplace.
Whether you’re a developer, product manager, or AI practitioner, the Agent Lab empowers you to build robust, scalable AI agents that drive real-world impact with minimal effort.
## Creating an Agent
1. **Navigate to Agent Builder:**\
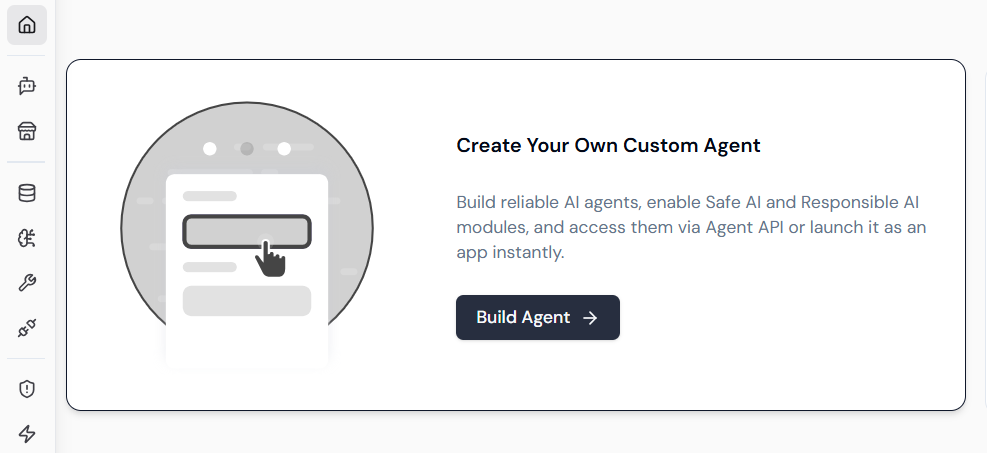
From the Lyzr Agent Studio page, select **Build Agent**.
2. **Provide Agent Details:**\
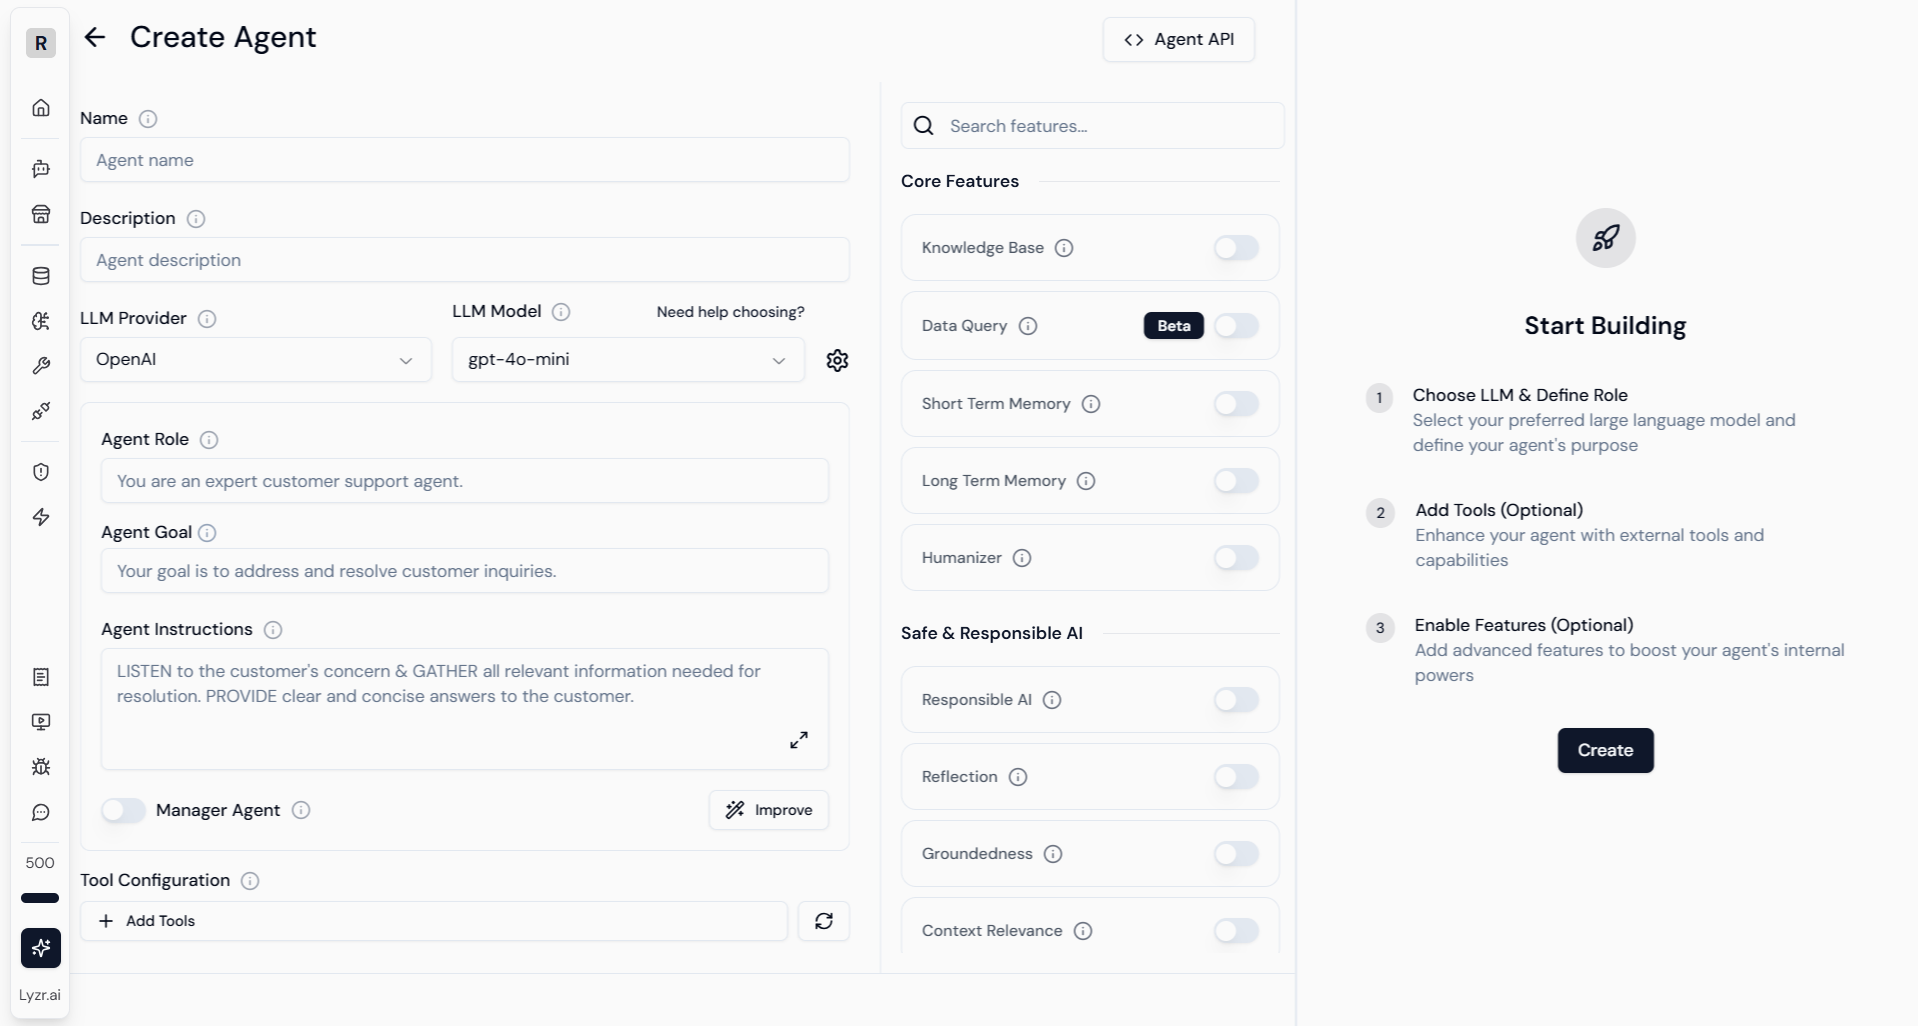
Enter a unique name for your agent and add a detailed description outlining its purpose.
3. **Select LLM Model:**\
Choose an appropriate Large Language Model provider and specific model for your agent’s use case. Configure parameters like temperature and Top P as needed.
4. **Define Agent Role and Instructions:**\
Specify the agent’s role (e.g., Customer Support, Data Fetcher) and provide instructions to guide its behavior. Use the **Improve** feature to refine these details.
5. **Add Tools (Optional):**\
Enhance your agent’s capabilities by integrating tools such as email sending, database queries, or custom APIs.
6. **Add Examples and Knowledge Bases (Optional):**\
Provide example prompts and responses to train your agent, and link relevant knowledge bases to improve accuracy.
7. **Select Features:**\
Choose from available features to further customize the agent’s behavior and output.
8. **Create and Test Agent:**\
Click **Create Agent** to save. Test the agent with sample queries and fine-tune as needed.
9. **Deploy Agent (Optional):**\
Deploy your agent by publishing it to the Agent Marketplace or use the provided JSON and API key for integration into your applications.
 ***
## Updating an Agent
1. **Access Agent List:**\
In the Agent Lab, open the list of your created agents.
2. **Select the Agent to Update:**\
Click on the desired agent to open its configuration panel.
3. **Modify Details:**\
Update the agent’s name, description, role, instructions, model selection, tools, examples, knowledge bases, or features as required.
4. **Save Changes:**\
After modifications, click **Save** to apply the updates.
5. **Retest the Agent:**\
Run tests to verify that updates yield the desired improvements.
***
## Updating an Agent
1. **Access Agent List:**\
In the Agent Lab, open the list of your created agents.
2. **Select the Agent to Update:**\
Click on the desired agent to open its configuration panel.
3. **Modify Details:**\
Update the agent’s name, description, role, instructions, model selection, tools, examples, knowledge bases, or features as required.
4. **Save Changes:**\
After modifications, click **Save** to apply the updates.
5. **Retest the Agent:**\
Run tests to verify that updates yield the desired improvements.
 ***
## Deleting an Agent
1. **Navigate to Agent List:**\
Open the list of all agents in the Agent Lab.
2. **Locate the Agent:**\
Find the agent you wish to delete.
3. **Delete Action:**\
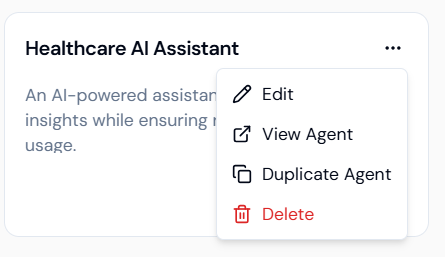
Click the **Delete** option (usually a trash icon or button) next to the agent’s name.
4. **Confirm Deletion:**\
Confirm the action in the prompt to permanently remove the agent.
> **Note:** Deleted agents cannot be recovered. Ensure you have backups or exports if necessary before deletion.
***
## Deleting an Agent
1. **Navigate to Agent List:**\
Open the list of all agents in the Agent Lab.
2. **Locate the Agent:**\
Find the agent you wish to delete.
3. **Delete Action:**\
Click the **Delete** option (usually a trash icon or button) next to the agent’s name.
4. **Confirm Deletion:**\
Confirm the action in the prompt to permanently remove the agent.
> **Note:** Deleted agents cannot be recovered. Ensure you have backups or exports if necessary before deletion.
 ***
## Multimodal Chat Inference v3
The **Multimodal Inference API** enables rich, intelligent conversations with AI agents by combining text input with contextual understanding from uploaded assets (PDFs, DOCX, and images).
You can:
* Chat naturally with an agent
* Provide documents or images as input (via asset IDs)
* Receive responses that incorporate those files
***
## 🔁 Endpoint
### `POST /v3/inference/chat/`
Initiates or continues a chat with an AI agent. The agent can use uploaded assets for context, making this a multimodal interaction.
***
## 📥 Request
### Headers
| Key | Value |
| ------------ | ---------------- |
| Accept | application/json |
| Content-Type | application/json |
### Body Parameters
| Field | Type | Description |
| ------------ | ------ | --------------------------------------- |
| `user_id` | string | User identifier |
| `agent_id` | string | ID of the agent to chat with |
| `session_id` | string | Unique identifier to track session |
| `message` | string | User's message to the agent |
| `assets` | array | List of asset IDs (PDFs, DOCXs, Images) |
### Sample Request
```json theme={null}
{
"user_id": "default_user",
"agent_id": "research_agent_001",
"session_id": "abc123-session-xyz",
"message": "Summarize the attached document.",
"assets": ["6fefwfw84930dfe", "6fewfwf12023ab"]
}
```
***
## 📤 Response
### 200 OK
```json theme={null}
{
"status": "success",
"agent_response": "The attached document discusses...",
"session_id": "abc123-session-xyz",
"agent_id": "research_agent_001"
}
```
***
## 🔍 Multimodal Use Case Examples
### 1. Ask Questions About a PDF
```json theme={null}
{
"message": "What are the key takeaways from this research paper?",
"assets": ["asset_923fdf21"]
}
```
### 2. Describe an Image
```json theme={null}
{
"message": "What is in this image?",
"assets": ["asset_image8921"]
}
```
### 3. Reference Multiple Files
```json theme={null}
{
"message": "Compare the information in these two reports.",
"assets": ["asset_q1_report", "asset_q2_report"]
}
```
***
## 📎 How to Get `asset_id`s
To use the `assets` field, first upload your files via:
### `POST /v3/assets/upload`
Get `asset_id` from the response and include it in your chat inference call.
***
## 🧠 Tips
* Keep using the same `session_id` to maintain context in a chat.
* Agents can handle multiple file types in a single request.
* Files are securely stored and accessible only by the authenticated user.
***
## 🧪 Python Example
```python theme={null}
import requests
import uuid
url = "https://agent-prod.studio.lyzr.ai/v3/inference/chat/"
headers = {
"accept": "application/json",
"Content-Type": "application/json"
}
payload = {
"user_id": "default_user",
"agent_id": "my_agent_01",
"session_id": str(uuid.uuid4()),
"message": "Summarize this document.",
"assets": ["your_asset_id_here"]
}
response = requests.post(url, headers=headers, json=payload)
print(response.json())
```
***
## 🚫 Errors
| Code | Meaning | Reason |
| ---- | --------------------- | --------------------------------------- |
| 422 | Validation Error | Missing required fields or bad asset ID |
| 500 | Internal Server Error | API failed to process due to an issue |
***
## Multimodal Chat Inference v3
The **Multimodal Inference API** enables rich, intelligent conversations with AI agents by combining text input with contextual understanding from uploaded assets (PDFs, DOCX, and images).
You can:
* Chat naturally with an agent
* Provide documents or images as input (via asset IDs)
* Receive responses that incorporate those files
***
## 🔁 Endpoint
### `POST /v3/inference/chat/`
Initiates or continues a chat with an AI agent. The agent can use uploaded assets for context, making this a multimodal interaction.
***
## 📥 Request
### Headers
| Key | Value |
| ------------ | ---------------- |
| Accept | application/json |
| Content-Type | application/json |
### Body Parameters
| Field | Type | Description |
| ------------ | ------ | --------------------------------------- |
| `user_id` | string | User identifier |
| `agent_id` | string | ID of the agent to chat with |
| `session_id` | string | Unique identifier to track session |
| `message` | string | User's message to the agent |
| `assets` | array | List of asset IDs (PDFs, DOCXs, Images) |
### Sample Request
```json theme={null}
{
"user_id": "default_user",
"agent_id": "research_agent_001",
"session_id": "abc123-session-xyz",
"message": "Summarize the attached document.",
"assets": ["6fefwfw84930dfe", "6fewfwf12023ab"]
}
```
***
## 📤 Response
### 200 OK
```json theme={null}
{
"status": "success",
"agent_response": "The attached document discusses...",
"session_id": "abc123-session-xyz",
"agent_id": "research_agent_001"
}
```
***
## 🔍 Multimodal Use Case Examples
### 1. Ask Questions About a PDF
```json theme={null}
{
"message": "What are the key takeaways from this research paper?",
"assets": ["asset_923fdf21"]
}
```
### 2. Describe an Image
```json theme={null}
{
"message": "What is in this image?",
"assets": ["asset_image8921"]
}
```
### 3. Reference Multiple Files
```json theme={null}
{
"message": "Compare the information in these two reports.",
"assets": ["asset_q1_report", "asset_q2_report"]
}
```
***
## 📎 How to Get `asset_id`s
To use the `assets` field, first upload your files via:
### `POST /v3/assets/upload`
Get `asset_id` from the response and include it in your chat inference call.
***
## 🧠 Tips
* Keep using the same `session_id` to maintain context in a chat.
* Agents can handle multiple file types in a single request.
* Files are securely stored and accessible only by the authenticated user.
***
## 🧪 Python Example
```python theme={null}
import requests
import uuid
url = "https://agent-prod.studio.lyzr.ai/v3/inference/chat/"
headers = {
"accept": "application/json",
"Content-Type": "application/json"
}
payload = {
"user_id": "default_user",
"agent_id": "my_agent_01",
"session_id": str(uuid.uuid4()),
"message": "Summarize this document.",
"assets": ["your_asset_id_here"]
}
response = requests.post(url, headers=headers, json=payload)
print(response.json())
```
***
## 🚫 Errors
| Code | Meaning | Reason |
| ---- | --------------------- | --------------------------------------- |
| 422 | Validation Error | Missing required fields or bad asset ID |
| 500 | Internal Server Error | API failed to process due to an issue |